








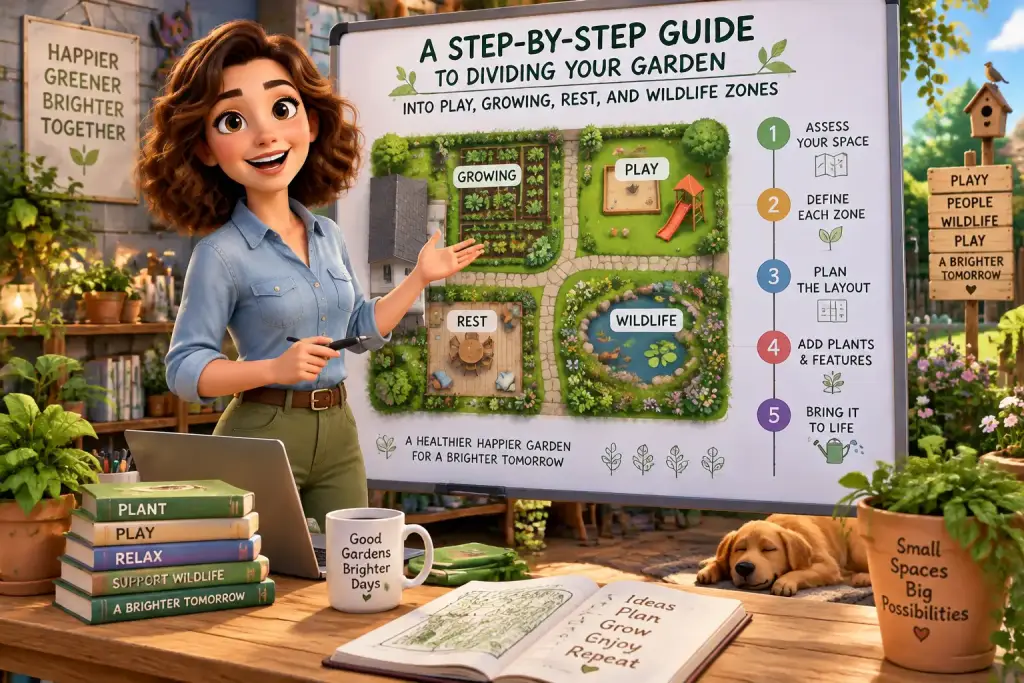
A good set of garden zones gives every part of your outdoor space a clear job. Instead of one busy area trying to do everything, you can create safe play space, sunny growing beds, a calm rest spot, and a quiet wildlife corner that work together.
- Put play areas near the house, growing beds in full sun, and wildlife areas in quieter edges.
- Use paths, low plants, mulch, or small fences to show where each garden zone starts and ends.
- Test your plan for two weeks before building permanent edges, patios, raised beds, or fences.
Table of Contents
Start Your Garden Zones With a Simple Site Check
Start by watching how sun, shade, wind, water, and foot traffic move through your garden for seven days. This quick check helps you place each zone where it will work well, rather than moving plants, furniture, or play gear later.
Take a rough sketch of the garden and mark fixed features first. Include the house, doors, sheds, fences, large trees, taps, drains, and any steep slopes. You do not need a perfect drawing. A simple plan on graph paper is enough if you note the basic size of each area. One square can stand for 1 metre.
Watch the garden at breakfast, midday, and late afternoon. Growing beds usually need six or more hours of direct sun for tomatoes, beans, squash, and most herbs. A rest zone can work in light shade, especially if you use it during hot afternoons. Wildlife areas often do best in a quieter edge where people do not walk every day.
Mark the daily movement lines
Walk your normal route from the house to the bin, washing line, tap, shed, gate, and seating area. These routes are your natural paths. Here is why that matters: a new flower bed will struggle if people keep cutting through it. Keep main paths at least 90 cm wide for easy walking, wheelbarrows, and garden jobs.
- Mark sunny spots with a yellow pencil.
- Mark wet ground, puddles, or downpipe outlets in blue.
- Mark noisy or busy spots near doors and paths.
- Mark calm edges that could suit a bird bath or log pile.
- Mark areas children already use for running or ball play.
Check the soil as well. Dig a small hole about 20 cm deep in two or three places. If water stays in the hole for hours after rain, avoid placing a main play area there. Use that spot for water-loving plants, a small rain garden, or a wildlife patch instead. Keep notes for one full week, including after rain.
How Much Space Does Each Garden Zone Need?
Each garden zone can be small if its purpose is clear. A 2 metre by 2 metre growing bed, a 3 metre by 3 metre play patch, a chair-sized rest spot, and a 1 metre wildlife edge can all make a useful start.
Give the play zone the clearest open ground, close enough to see from the house. A small lawn, bark area, or firm grass patch can work for younger children. Leave at least 1 metre of empty space around swings, climbing gear, or a small goal. Check maker safety rules if you use play equipment, and keep hard edging away from running routes.
Set practical size targets
Use the garden size you have, not an ideal plan from a large property. A narrow town garden may have zones that overlap at different times. For example, a patio can be a rest zone during meals and a craft space during play. Raised beds can sit beside the patio if they do not block the main route.
- Play zone: Aim for 9 square metres or more for active play, if space allows.
- Growing zone: Start with one or two beds, each about 1.2 metres wide.
- Rest zone: Leave enough room for two chairs and a small table, about 2 metres by 2 metres.
- Wildlife zone: Reserve at least 1 square metre for native plants, leaf litter, or a log pile.
On the flip side, do not force four equal areas into a very small garden. The growing zone may need more space if food is your main goal. A family with active children may need a larger play patch and fewer beds. As a rule of thumb, give the most space to the activity you use at least three times each week.
Keep the growing zone close to a water source. Carrying watering cans across the whole garden gets tiring fast, especially in dry weeks. Put herbs and salad leaves within 10 to 15 steps of the kitchen door if possible. That small choice often means they get picked and watered more often.
Lay Out Paths, Edges, and Zone Boundaries
Use simple boundaries to show where one garden zone ends and the next begins. Paths, mulch, low plants, raised beds, and small changes in ground level can separate uses without making the garden feel closed off.
Start with temporary markers. Lay a hosepipe on the ground to show curved paths, or use string and bamboo canes for straight lines. Live with the layout for at least a week. Walk it while carrying shopping, garden tools, and a watering can. In everyday use, this step takes about five minutes each day and can stop costly changes later.
| Zone task | Simple boundary | Useful tool or material |
|---|---|---|
| Keep play away from beds | Wide grass strip or bark line | Garden hose and wooden pegs |
| Reach growing beds easily | 90 cm main path | Measuring tape and wheelbarrow |
| Make rest space feel calm | Low planter or tall grasses | Two chairs and potted plants |
| Protect wildlife corner | Mulch edge and low twig barrier | Leaves, logs, and native plants |
Choose path surfaces by use, not looks alone. Grass is soft and cheap, but it becomes muddy in wet weather. Wood chips suit informal routes near beds and wildlife areas, though they need topping up each year. Gravel drains well but can spread into lawns and is not always easy for small wheels. Flat paving is useful near doors and seating, but use only the amount you need.
When we tested this setup in a small back garden, the most useful change was widening one narrow route beside the vegetable beds. A path that looked fine on paper was too tight for a wheelbarrow. Instead of guessing, test the route with the largest item you regularly move. Add 10 to 20 cm more width if it feels tight.
How Do You Build Each Zone in the Right Order?
Build the main paths and active play area first, then add growing beds, rest features, and wildlife details. This order protects new plants from foot traffic and helps you avoid placing heavy items on soil you later need for food crops.
Start by clearing only what you need. Keep healthy trees, useful shrubs, and patches of native plants where possible. They already give shade, shelter, and food for insects and birds. Remove weeds by hand, cover bare soil with cardboard and mulch, or use a garden fork to loosen compact ground. Avoid using weed sprays near food beds, ponds, or wildlife areas.
Build from busy to quiet
Put the play zone near the house or where adults can see it easily. Use soft ground under play items, such as grass, wood chips, or a tested safety surface. Keep thorny plants, deep water, compost bins, and tool storage away from this area. A small bench nearby gives adults a place to sit without stepping into the play space.
Build growing beds next. Raised beds should be no wider than 1.2 metres if you can reach them from both sides. Fill them with soil and finished compost, then mulch around plants to hold moisture. Our guide to simple compost habits can help you turn kitchen and garden waste into useful soil food without buying lots of bagged products.
Place the rest zone after the working areas are clear. Set chairs where you can see a view you enjoy, such as flowers, a small pond, or a bird feeder. Use a shade sail, small tree, or climbing plant if summer sun is strong. Leave enough open space to pull chairs out safely, especially near a path or door.
Finish with the wildlife zone in the least busy corner. Add a shallow water dish with stones for insects, a pile of dry branches for beetles, and flowering native plants for pollinators. Keep bird food clean and place it away from cat hiding spots. A wildlife zone does not need to look messy, but it should have cover, water, and fewer disturbances.
Fix the Layout Problems That Show Up First
Most garden zone problems come from paths that are too narrow, beds placed in shade, or wildlife areas set beside busy activity. Fix the use problem first, then improve the look with plants, edging, or furniture.
A muddy play patch needs better drainage or a different surface. Start by checking where roof water flows after rain. Redirect clean roof water into a planted soakaway or rain garden where local rules allow. Do not send water toward the house or a neighbour’s land. For a simple fix, raise the play area slightly and use a surface that drains well.
Plants that grow poorly may be in the wrong light or soil. Leafy crops like lettuce and parsley can manage with partial shade, while tomatoes and peppers need stronger sun. Move pots before rebuilding a whole bed. A container trial for two weeks can show if the light is good enough. Keep notes on what you planted, where it sat, and how it performed.
Wildlife corners sometimes become a dumping spot for broken pots, plastic, or wet piles of grass. That does not help insects or birds. Use natural materials with a clear purpose: dry logs for shelter, hollow stems for insects, clean water for drinking, and native flowers for food. Keep the area about 1 metre from the main path so it stays calm but remains easy to check.
The takeaway here: every zone needs a clear edge and a clear job. If children run through the rest area, add a low planter or shift the chairs. If tools sit on the patio all week, place a weatherproof tool box near the growing beds. Small fixes are better than waiting for the whole plan to feel wrong.
As a rule of thumb, lay out paths with hosepipe or string for at least seven days before adding gravel, stone, or wood edging.
Keep the Four Zones Working Through Daily Use
Check your garden zones during normal use for two weeks, then make small changes based on what people actually do. A working plan should make play safer, growing easier, rest calmer, and wildlife less disturbed.
Use a simple weekly check. Walk the main paths after rain, look for crushed plants near play areas, and check that watering tools return to the growing zone. Brush gravel back into place, top up wood chips, and remove trip risks. A five-minute check each weekend is usually enough for a small or medium garden.
Watch how each person uses the space. A child may prefer a clear route for a scooter. Someone who gardens may need a seat beside the beds. You may find that the calmest rest spot is not the one you first planned. Move light furniture before building fixed structures. This keeps the plan flexible and reduces wasted materials.
Set seasonal jobs for each area. In spring, add compost and plant the growing beds. In summer, water early and cut back plants that block paths. In autumn, leave some dry stems and fallen leaves in the wildlife zone. In winter, check fences, path edges, and stored play items. These small jobs support the full plan without turning every weekend into hard work.
Keep a short list on your phone or a weatherproof note near the back door. Our guide to weekly garden habits offers a simple routine for checking soil, paths, plants, and water use. After one full season, you will know which zones need more room and which ones can stay small.
A garden with four clear uses does not need to look strict or perfect. It needs to feel easy to use. Make space for the activity that matters most, protect the plants and wildlife from heavy traffic, and let your plan change as your household changes. That is how separate zones become one garden that works every day.

Matteo Mariani
Founder & Lead Landscape EditorBorn and based in Italy, Matteo Mariani is the founder and lead editor of Eco Zoned. He helps readers make thoughtful outdoor planning choices with practical advice on lower-impact gardens, functional spaces, and landscape zones for everyday homes.