









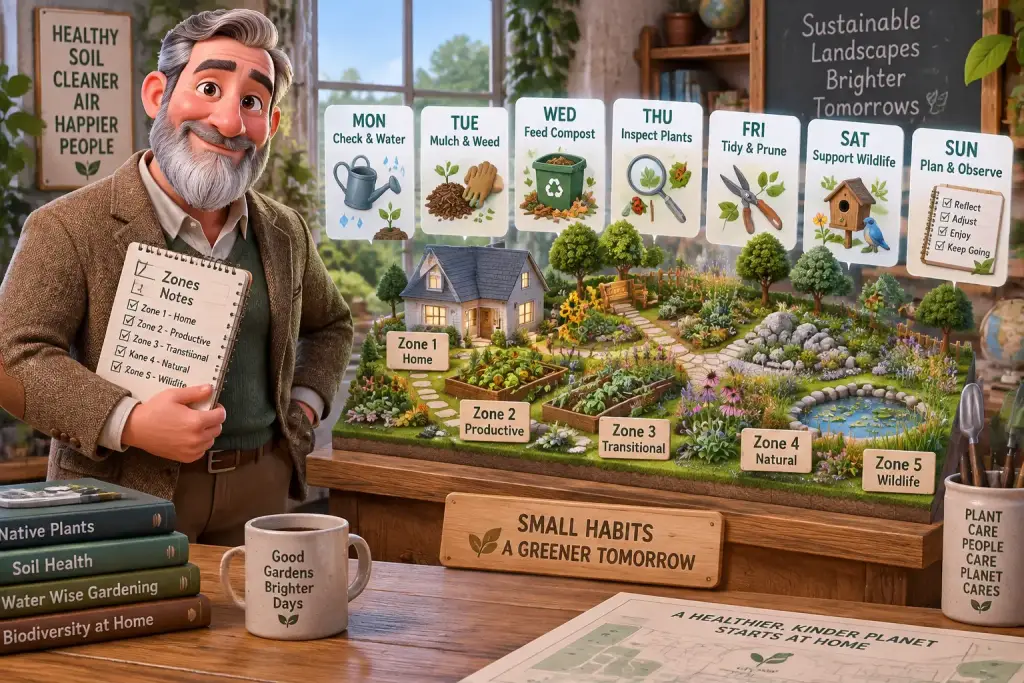
Good garden habits keep a zone plan useful after the first plants go into the ground. A five-minute check can catch dry soil, spreading weeds, or a broken drip line before one small issue turns into a long weekend job. Look at it this way: your yard does not need perfect care every day. It needs short, steady attention in the places that matter most.
- Walk every garden zone once a week and look for dry soil, weeds, blocked paths, and signs of wildlife.
- Water only when the soil below the surface is dry, then water slowly near plant roots.
- Keep a short zone notebook so you can repeat what works and change habits that waste water or time.
Table of Contents
- Start Each Week With a Five-Minute Zone Walk
- What Should You Check Before Watering Each Zone?
- Pull Small Weeds Before They Take Over Beds
- Build a Weekly Zone Check List You Can Repeat
- How Do Mulch and Compost Support a Zone Plan?
- Match Weekly Jobs to How Each Zone Is Used
- Keep Seasonal Notes So Next Week Gets Easier
Start Each Week With a Five-Minute Zone Walk
Start with a five-minute walk through every zone before you pull weeds or turn on water. This quick habit shows you where plants need help, where soil is holding moisture, and where a small repair can save work later.
Carry a phone, a small notebook, or a paper garden map. Walk the same route each time so you do not miss a corner. Begin near the house, then move through the food beds, sitting area, water-wise planting area, and wildlife space. You are not trying to fix everything during this walk. You are simply looking, touching, and making short notes.
Check the soil with one finger in each main planting bed. Push down about 5 cm. If the soil feels cool and damp, wait before watering. If it feels dry and dusty below the top layer, mark that zone for a slow drink. Also look at plant leaves. Drooping leaves at noon may be normal on a hot day, but leaves still drooping at sunset can mean the roots need water.
Use the same four checks
Keep the first walk simple. A small routine is easier to keep than a long list that feels like homework. In everyday use, this step takes about five minutes for a small or medium home garden.
- Check soil moisture 5 cm below the surface.
- Look for new weeds before they make seeds.
- Watch for puddles, leaks, or water running onto paths.
- Notice bees, birds, worms, and other helpful garden life.
When we tested this setup in a small yard, the weekly walk found a loose drip tube behind a shrub before it wasted water for weeks. It also showed that one sunny bed dried two days sooner than the rest. That kind of note helps you water by zone instead of giving every part of the yard the same amount.
Day to day, the goal is not to make every plant look the same. A native shrub may look a little rough after hot weather and still be healthy. A thirsty vegetable bed needs more care than a low-water planting bed. Your walk helps you see those real differences.
What Should You Check Before Watering Each Zone?
Check soil depth, plant type, weather, and the water system before watering each zone. Water only the areas that need it, because plants with different roots and sun levels should not follow one fixed schedule.
Start with the soil test. The top 1 cm can look dry even when the lower soil is still wet. Push a finger, trowel, or wooden stick about 5 cm into the ground. For larger shrubs, test closer to 10 cm down. If soil sticks to the tool and feels cool, hold off. If it falls away like dust, that zone may need water.
Give water slowly near the root area. Fast water often runs off hard soil, slopes, and mulch. A drip irrigation line, soaker hose, or watering can placed close to the ground gives plants time to take in moisture. For a young vegetable bed, try watering for 15 to 30 minutes with a slow drip line, then check how far the water moved into the soil.
Water needs also change through the week. A shaded bed after rain may need nothing. A raised bed in full sun may dry fast, especially when it holds tomatoes, beans, or herbs. If you are building a lower-water part of the yard, our guide to a water-wise planting zone can help you group plants with similar needs.
Watch for waste, not just dryness
Stand near the system for one full watering cycle at least once a week. Check that drip emitters point at soil instead of paths. Look for spray hitting fences, walls, or plant leaves. A wet path is often a clear sign that water is going somewhere it does not help.
Rain sensors and simple timers can help, but they still need a human check. A timer does not know that a hose has come loose. It also does not know that rain soaked the soil yesterday. Modern tools save time only when your weekly check keeps them set correctly.
Keep a rain gauge if you want clearer numbers. Write down rainfall and watering days. After one month, you may notice that one zone gets watered far more than it needs. This is useful proof when you decide where to add mulch, move plants, or repair a line.
Pull Small Weeds Before They Take Over Beds
Pull weeds when they are small and the soil is slightly damp, usually after rain or watering. Ten minutes of weekly weeding stops seed spread, protects young plants, and avoids the need for harsh weed killers later.
Focus first on weeds growing close to vegetables, new shrubs, and small native plants. These plants have shallow roots and lose water quickly when weeds crowd them. Pull the weed low near the soil, then lift slowly. If the soil is hard, use a hand fork rather than tugging hard and breaking the root.
Do not try to clear every wild plant in one day. Some tiny volunteer plants may not cause trouble, and bare soil can bring even more weeds. The main job is to stop weeds from shading wanted plants or making seeds. If you see flower heads forming, remove those first.
Use a bucket during your weekly walk. Place weeds with seeds in yard waste instead of leaving them on the bed. Small green weeds without seeds can go into a compost pile if the pile gets warm enough. If you are not sure, keep seed heads out of compost. One missed seed can make more work next season.
Mulch makes this job much easier. Spread shredded leaves, bark, or clean straw around plants at a depth of about 5 to 8 cm. Keep mulch about 5 cm away from plant stems. Mulch touching stems can hold too much dampness and may cause rot.
A clear path edge also helps. When grass and weeds creep into a flower bed, trim the edge once a week with hand shears or a small edging tool. This takes only a few minutes but makes the whole zone easier to read. You can quickly see where the bed begins, where mulch is thin, and where unwanted plants are moving in.
Build a Weekly Zone Check List You Can Repeat
Use one short check list for every zone, then give each area only the care it needs. A repeatable plan saves time because you stop guessing and can see which jobs belong this week.
Put the list on a clipboard near your back door, or keep it in a notes app. Give every zone a simple name, such as Front Dry Bed, Herb Box, Rain Garden, or Bird Corner. Short names make records easier to scan. They also help family members understand which area needs care.
| Weekly habit | What to check | Simple action |
|---|---|---|
| Soil test | Moisture 5 cm deep | Water slowly only if dry |
| Weed scan | Small weeds and seed heads | Pull for 10 minutes |
| Mulch check | Thin spots and bare soil | Add 5 to 8 cm of mulch |
| Water system check | Leaks, blocked emitters, runoff | Move or repair the line |
| Wildlife check | Bird water, flowers, shelter | Refill water and leave safe cover |
Try assigning one bigger task to each day instead of doing all garden work at once. Monday can be the soil and water check. Wednesday can be weeding. Saturday can be mulch, compost, or path work. This breaks the work into small pieces and keeps the garden from feeling like a heavy chore.
To make this easier, use a simple color mark on your map. Blue can mean water needed. Green can mean no action. Yellow can mean watch next week. Red can mean fix soon, such as a leaking hose or a plant that keeps wilting. You do not need a special app. A pencil and paper are enough.
For a fuller routine that includes water, weeds, and garden life, use this weekly zone routine as a helpful extra guide. The best system is the one you can follow even during a busy week.
How Do Mulch and Compost Support a Zone Plan?
Mulch and compost support a zone plan by helping soil hold water, feeding plants slowly, and cutting weed growth. Use mulch on the soil surface and compost in planting beds, but keep both materials away from stems and tree trunks.
Mulch is the cover on top of the soil. It can be chopped leaves, bark chips, pine needles, or clean straw. In dry planting areas, mulch slows water loss and keeps the soil cooler. In food beds, leaf mulch can also protect bare soil between crops. A good layer is often 5 to 8 cm deep, but very fine mulch may need a thinner layer so it does not pack down.
Compost works differently. It is finished plant material that you mix into the top soil or place in a thin layer around plants. Add about 2 to 3 cm of finished compost to vegetable beds in spring or before a new crop. Do not keep adding large amounts every week. Too much compost can give plants more food than they need and may wash away during heavy rain.
Match materials to the zone
A low-water shrub bed often does well with bark or leaf mulch because it stays in place and needs less care. A vegetable bed may use chopped leaves or straw because you can move it aside when planting seeds. A path may use wood chips, but check it after rain so chips do not wash into a drain.
- Pull weeds and water dry soil first.
- Spread compost in a thin, even layer if the bed needs it.
- Add mulch over bare soil, leaving space around stems.
- Check the layer each week and refill thin areas.
Keep a small compost bin close to where garden waste starts. This makes it more likely that leaves, plant cuttings, and vegetable scraps will become useful soil material. Avoid putting meat, dairy foods, oily foods, or pet waste in a home compost pile. These can smell bad and bring pests.
Look for earthworms when you move mulch or compost. Their presence often means the soil has food and moisture. Do not worry if you do not see them every time. Very dry soil, cold weather, and fresh mulch can change where worms are hiding.
Write the date, weather, water used, and one problem for each zone. After four weeks, your notes will show where most garden work is needed.
Match Weekly Jobs to How Each Zone Is Used
Match your weekly jobs to each zone’s job, not to one rule for the whole yard. Food beds, play areas, wildlife corners, and dry shrub beds need different care, so give your time where it has the most value.
The zone near your door often gets the most use. Check paths, pots, herbs, and outdoor sitting areas first. Sweep leaves from steps so they do not block drains. Refill a small bird water dish if you keep one, and scrub it with a brush and clean water once a week. Fresh water helps birds, but dirty standing water can cause problems.
Food growing zones usually need more visits. Pick ripe vegetables, tie up tall plants, and look under leaves for damage. Remove badly damaged leaves instead of spraying at the first sign of an insect. Some insects are food for birds and helpful bugs. If pests keep growing, first check whether the plant is crowded, thirsty, or weak from poor soil.
Low-water zones should need less work once plants are settled. Check for new weeds, thin mulch, and plants that are still getting used to their spot. Do not water a whole dry bed because one new plant is thirsty. Give that plant a slow drink at its root area, then watch it during the next weekly check.
Wildlife zones benefit from a lighter touch. Leave some fallen leaves under shrubs, keep a few dry stems through winter, and avoid cutting every corner neat. These small messy areas can give insects and other small animals cover. Still, remove litter, broken plastic, and any netting that could trap an animal.
A small yard can still have clear zones. Pots near a door can be your herb zone. One corner with native flowers can be your wildlife zone. A narrow bed with mulch and drought-tolerant plants can be your low-water zone. Our small-yard home zone plan shows how these spaces can work together without needing a large plot.
Keep Seasonal Notes So Next Week Gets Easier
Keep short seasonal notes after each weekly check so you can repeat good results and avoid old problems. Record weather, water, weeds, plant growth, and repairs in one place, then review the notes once a month.
Write only facts that help you act. For example, note, “Herb pot dry after three hot days,” or “Drip tube near beans came loose.” Avoid trying to write a full diary. Two or three lines per week are enough. From there, you can spot patterns that memory often misses.
Take one photo from the same spot every month. Photos show changes in shade, plant size, bare soil, and path wear. A bed may seem fine when you see it each day, yet a photo from last month may show that one shrub is blocking a smaller plant. This makes moving or trimming plants a calmer choice.
Set seasonal jobs beside your weekly routine. In spring, check new growth, add compost, and repair irrigation. During hot weather, watch soil moisture and refill mulch. In fall, collect leaves for mulch and clear blocked drains. In winter, check branches after storms and plan small changes for the next growing season.
Give yourself a simple success measure. You might aim to water only when soil tests show dryness, keep bare soil covered, or spend less than 30 minutes a week on routine care. These are real wins. A healthy zone plan should slowly need less emergency work because the soil, plants, and water habits are working together.
Do not chase a perfect garden. A few weeds, chewed leaves, and fallen twigs are normal signs of an outdoor space that is alive. Keep showing up for the small weekly checks. Over time, those steady garden habits can make your home zones healthier, easier to care for, and more pleasant to use.

Matteo Mariani
Founder & Lead Landscape EditorBorn and based in Italy, Matteo Mariani is the founder and lead editor of Eco Zoned. He helps readers make thoughtful outdoor planning choices with practical advice on lower-impact gardens, functional spaces, and landscape zones for everyday homes.