









Choosing plant heights starts with the spaces people use every day. A good layer plan keeps a 3-foot path clear, leaves windows bright, and gives each plant enough room at its full size. The aim is not to fill every open spot. It is to place low, medium, and tall plants where they help your home landscape zone work better.
- Mark paths, windows, doors, and sunny areas before choosing plant sizes.
- Use mature height and mature spread, not the size shown in the garden center pot.
- Keep low plants beside paths and place taller plants where their shade will not block useful space.
Table of Contents
- Mark plant heights before buying plants
- How do you measure space around paths and windows?
- Place tall plants where their shade has value
- How can you keep paths clear as plants grow?
- Use plant layers without making beds too dense
- Fix crowded plants before they block light or access
- Check your plant plan through daily use and seasons
Mark plant heights before buying plants
Start by marking every path, window, door, seating area, and sunny growing space on a simple yard sketch. Then set a safe height limit for each spot before you buy plants. This stops a small shrub from becoming a wide wall beside a walkway after two or three growing seasons.
Use graph paper, a phone drawing app, or a printed home plan. You do not need exact building plans. A rough map is enough if you include the places where people walk and the parts of the house that need daylight. Draw paths as lines with their real width. Mark windows with a small box on the house edge. Add arrows that show where the sun comes from in the morning, at midday, and late afternoon.
Write down the mature height and spread of each plant you are thinking about. Mature height means how tall it should become in normal soil and light. Mature spread means how wide it may grow. Plant tags can be useful, but also check a trusted local nursery guide or your local university extension guide because plant size can change with climate, water, and pruning.
Here is why that matters: a 2-foot plant in a pot can become 5 feet wide. If you plant it 18 inches from a path, it will soon lean into the walking space. You may be able to trim it, but regular hard cutting often makes more work and can leave a plant thin or bare.
Make four simple map marks
Use one color for access areas and another color for light needs. This small task takes about 15 minutes for a basic front or back yard zone.
- Draw every main path, gate opening, step, and driveway edge.
- Mark windows that bring light into kitchens, living rooms, and work areas.
- Circle full-sun beds, part-shade beds, and areas with deep shade.
- Write the mature height limit beside each small planting space.
As a rule of thumb, choose plants that stay below 12 inches beside narrow paths. Use plants from 18 to 36 inches for wider bed edges. Save plants taller than 4 feet for bed backs, corners, privacy areas, or places where their shadow will not fall across vegetables or solar panels.
How do you measure space around paths and windows?
Measure from the edge people use, not from the center of a path or the base of a wall. Leave room for the plant’s mature spread plus a clear walking strip, so leaves and branches do not brush legs, bags, bikes, or wheelchairs.
A common garden path is 3 feet wide, which works for one person walking comfortably. A main route from a driveway to the front door often needs 4 feet or more. If you have a stroller, mobility aid, garden cart, or wheelbarrow, test the route with that item. The clear space matters more than the hard surface size because plants often bend outward after rain.
For a path beside a planting bed, keep the expected plant spread at least 12 inches away from the path edge. Give soft grasses and loose perennials more room because they flop in wet weather. Thorny plants, woody shrubs, and plants that attract bees should sit farther back, often 24 to 36 inches from busy routes.
Windows need both height and distance checks. A low plant can still block a window when it is planted close to the wall. Stand about 6 feet inside the room and look out. If a shrub will mature at the bottom half of the window, place it far enough away that its top sits below the sill line from that view. For ground-floor windows, keeping plants 18 to 24 inches from the wall also helps air move around the home.
Use a cane to test future height
Place a bamboo cane, rake handle, or straight branch where the plant will go. Mark the expected mature height with tape, then step back to view it from the path, door, and indoor room. This gives a much better picture than reading a plant label while standing in a garden center.
When we tested this setup beside a kitchen window, a planned 4-foot shrub looked fine from the lawn. From the sink, it covered most of the lower view. Moving it 3 feet farther out and using a 2-foot native perennial near the wall kept the window bright without leaving bare soil.
- Measure the path width and the space from path to bed edge.
- Check the plant’s mature width, then divide that number in half.
- Add at least 12 inches of clear space for a quiet path.
- Add 24 inches or more beside doors, gates, and main walkways.
- Test the planned height from indoors before planting.
Place tall plants where their shade has value
Put tall plants on sides where their shade helps rather than harms. In most home yards, taller trees and shrubs work best away from sunny food beds, low windows, and solar equipment. Their shade can cool a patio, soften a hot wall, or give birds cover without taking light from plants that need full sun.
Watch your site at three times on a sunny day: around 9 a.m., noon, and 4 p.m. Take photos from the same spots. The sun angle changes through the year, but these photos show the main pattern. A tall plant that looks harmless in early summer can cast a long shadow in spring or fall, when the sun sits lower.
Think about the plant canopy, not only the trunk. A small tree may have a narrow trunk but a canopy 12 to 20 feet wide. Large shrubs can also create a solid shade block. If you grow tomatoes, herbs, flowers for pollinators, or other sun-loving plants, give them a clear south-facing or west-facing area based on how your yard faces.
On the flip side, shade is useful in the right place. A small tree on the hot side of a patio can make summer sitting more pleasant. A layered border beside a fence can cool soil and reduce water loss. The best choice depends on what the zone needs most: food growing, outdoor use, privacy, wildlife cover, or a clear view.
Build height from low to high
For a bed seen from one side, use the shortest plants at the front, medium plants in the middle, and tall plants at the back. This keeps each layer visible and makes trimming easier. For an island bed seen from all sides, place taller plants near the center and lower plants around the edge.
Keep each layer loose enough for air and light to reach the soil. A crowded bed may look full in its first year, yet become hard to weed and water later. Leave the planned gaps. You can cover open soil with leaf mulch, wood chips, or short-lived annual flowers while young plants grow.
How can you keep paths clear as plants grow?
Keep paths clear by setting a mature spread limit and checking it every month during active growth. Choose low, tidy plants beside walkways, then cut back only small amounts before stems lean across the route. This is easier than trying to force a large shrub into a narrow bed.
Plants move through the year. Heavy rain can push stems outward. Wind can bend ornamental grasses. Warm, wet weeks can make groundcovers spread fast. Set a simple path rule: no leaves, flowers, branches, or thorns should sit inside the walking width. A path is part of your home zone, not extra space for a plant.
Use edging when it helps guide plants, but do not depend on edging to stop growth. Metal, brick, stone, and wood edges can make the bed line easy to see. They cannot stop a mature plant from growing over the top. Select plants with a natural width that fits the bed, then use edging as a visual guide.
| Area to protect | Safe plant setting | Simple check tool |
|---|---|---|
| Narrow side path | Plants below 12 inches, set back 12 inches | Tape measure |
| Main front walk | Keep 24 inches clear beside the hard surface | Garden cart test |
| Ground-floor window | Keep shrubs below sill view or farther from wall | Bamboo cane |
| Sunny food bed | Keep tall canopy north or away from sun path | Three daily photos |
| Patio edge | Use medium plants outside chair and table space | Chalk outline |
In everyday use, this check takes about five minutes. Walk your usual route with a basket or watering can. If foliage catches your arm, blocks your feet, or hides a step edge, cut back the soft growth or move the plant while it is still young. Regular small checks make the work calm and quick.
A weekly walk also fits well with other low-waste care tasks. Our guide to weekly garden habits can help you pair path checks with mulch checks, watering, and simple hand weeding.
Use plant layers without making beds too dense
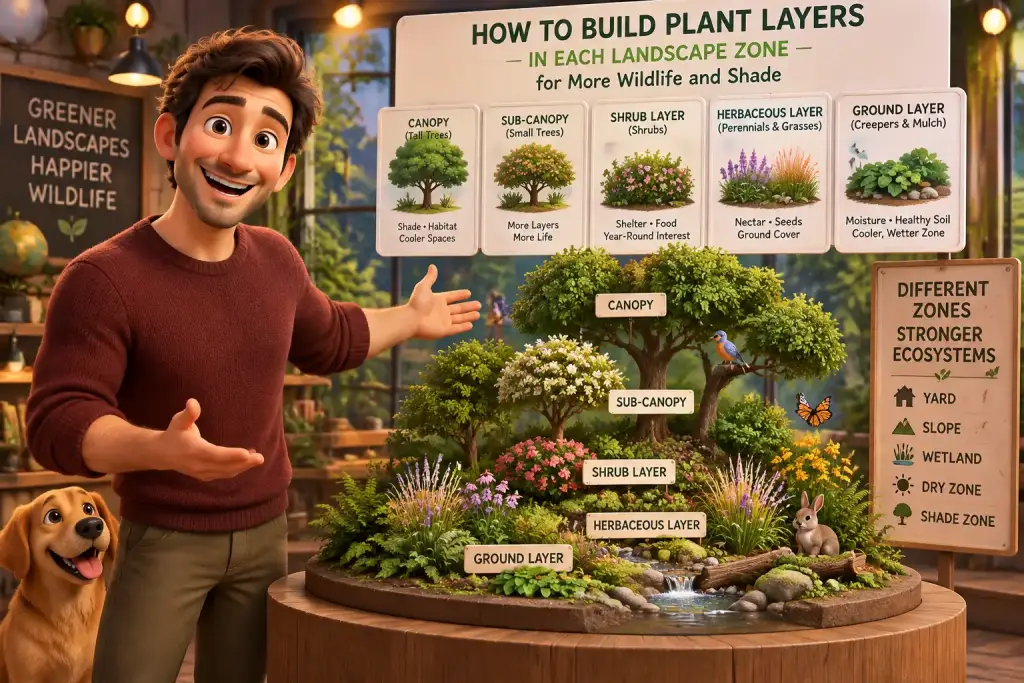
Use three or four plant layers, but leave open space between them for light, water, and access. A low ground layer, medium flowering layer, shrub layer, and tree canopy can share one zone when each plant has a clear job and enough mature room.
Low layers often include groundcovers, sedges, small herbs, and short flowering plants. They protect soil from hard rain and help limit weeds. Keep these plants under 12 to 18 inches close to paths and windows. Choose spreading plants with care. A fast groundcover can enter a path or cover smaller plants if it is not suited to the space.
The middle layer is usually 18 inches to 4 feet tall. This is where many native flowers, small shrubs, and grasses sit. These plants give color, seed, and shelter for insects and birds. Place them where they do not hide house numbers, steps, hose taps, or views needed for safe driving.
The upper layer includes taller shrubs and trees. Use it in larger beds, fence lines, outer yard edges, and spots where privacy is wanted. Keep its roots and canopy in mind. A tall tree close to a small bed may take water and light from everything below. In a small yard, one well-placed small tree can work better than several large shrubs.
Instead of guessing, draw circles for each plant’s mature spread on your plan. Circles should touch lightly or leave small gaps, not overlap heavily. This method shows when a bed has too many plants before you spend money or dig holes. For more ideas about matching each layer to wildlife and shade needs, see our guide to plant layers.
Use mulch in the open areas during the first two years. It holds soil moisture, helps reduce weeds, and gives plants time to reach their planned size. Filling every gap with extra plants may look neat at first, but it often leads to crowding, more cutting, and weaker growth later.
Stand inside each main room before planting, then hold a bamboo cane at the planned plant height to check if the future plant will block light or views.
Fix crowded plants before they block light or access
Fix crowding early by cutting back soft growth, dividing perennials, or moving young plants to a better zone. Do not wait until a path is closed or a room becomes dark. Small changes are usually easier, cheaper, and less stressful for the plant.
Start with the cause of the problem. A plant may be too tall for the spot, too wide for the bed, or simply leaning toward light. If it is the wrong type for the space, moving it is often better than yearly heavy pruning. A sun-loving plant placed in shade may stretch toward the brightest opening and become weak or lopsided.
Perennials are often easiest to divide in cool weather, when the soil is moist and the plant is not under heat stress. Dig around the root ball, lift it carefully, and split it into smaller parts if the plant type allows this. Replant one piece with full spacing and share, compost, or place the other pieces in a larger zone.
Shrubs need a slower approach. Remove dead, damaged, or crossing branches first. Then remove only a small part of healthy growth at one time. Cutting a shrub down hard can cause fast, weak shoots or leave a poor shape. If it needs strong cutting every year to fit, replace it with a shrub that matures at the right size.
Spot the warning signs
These signs tell you a plant plan needs attention before the issue gets bigger:
- Leaves touch people walking on the path after rain.
- Branches cover a window from inside the room.
- Flowers or grasses hide a step, gate latch, or house number.
- One plant shades a full-sun bed for several hours each day.
- Plants overlap so tightly that soil stays wet and hard to reach.
The takeaway here: pruning is useful for care, but it is not a fix for poor placement. Choose a plant that suits the height limit, width limit, and light level of the zone. This saves water, plant waste, and repeated work over the years.
Check your plant plan through daily use and seasons
Check the plan while you walk, sit, garden, and look through windows during each season. A plant layout works when paths stay open, indoor rooms keep useful daylight, and sun-loving areas receive the light they need at the times they need it.
Use your yard normally for two weeks after planting. Carry groceries from the car. Take out bins. Open gates. Sit on the patio. Water the beds. These normal actions show problems that a paper plan cannot show. A shrub may be clear from one angle but block the view when you pull into the driveway. A grass may be fine in dry weather but fall onto the path after a storm.
Check sunlight in spring, summer, and fall. Deciduous trees can give welcome summer shade while allowing more winter light. Evergreen plants hold their shade all year, so use them with more care near windows and food beds. Take one photo from the same point each season, then compare the image with your original sketch.
Keep short notes on plant labels or in a phone file. Record when a plant reaches its tallest point, how wide it becomes, and whether it needs support. After one full growing year, you will have better information than any tag can give for your own soil and weather. This also helps when planning nearby drought-wise areas, such as those in our drought-tolerant zone guide.
Review the plan each winter, when branches and bed lines are easier to see. Decide which plants need moving, dividing, or a new place. A clear height plan is not fixed forever. It is a simple working system that changes as plants mature, your needs change, and each home landscape zone becomes easier to use.

Matteo Mariani
Founder & Lead Landscape EditorBorn and based in Italy, Matteo Mariani is the founder and lead editor of Eco Zoned. He helps readers make thoughtful outdoor planning choices with practical advice on lower-impact gardens, functional spaces, and landscape zones for everyday homes.